I'm so excited and extremely proud!! I seriously did this in 4 hours start to finish! Woohoo! Chicks Rule!!

Ok. Let me tell you how I did it and what you need to do it too!
First thing I did was read two different Pinterest How to'ers on how they did it. Then I measured how tall my sofa was & how tall the table could be and still fit under my window trim.

Then I measured the length of the sofa.

With these two measurements my bf (Adrian) told me over the phone to draw a sketch. Ok..... not sure why, but ok! Turned out to be a good idea. But I'm not telling him that! Don't want him thinking he's indespensible! So I sketched a drawing of what I was gonna build with measurements. Just so I could look at it while I was building it.... Mind you, I've never sketched a thing in my life.... Lol... my daughter Katie Sue asked if I wanted lined paper to do it... Hehehe.. I told her, "No, its not that serious." She looked at me like I was nuts! I think it turned out fine.

Here is what I considered in drawing my sketch. The wood was gonna be 1 inch x 8 inches by 8 ft long. The couch was roughly 6 ft 10 inches; and the height was roughly 32 inches. So in my sketch I decided to have the legs be 31 inches since the top board of the table was an inch thick. It is gonna sit on top of the legs and and I couldn't have the total height of the table be more than 32 inches. So my sketch each leg at 31 inches with a table top that is 6 ft 10 inches long.
In the two Pinterest How to's I found I felt they looked a bit wobbly.... So I wanted to compensate for a corrective fix on that! Cuz I could just see me doing all this work and the darn thing break and fall to the floor when I had company over.... (Dear Lord that would put me over the top!) So decided to use a 2 x 4 to stabilize the table. I drew the 2 x 4 into the sketch at approximately 15 in up each leg.
Ok. That's all I did with my sketch.
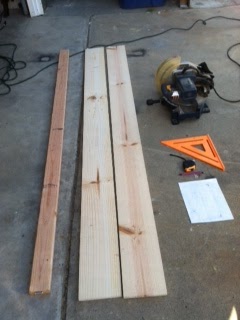
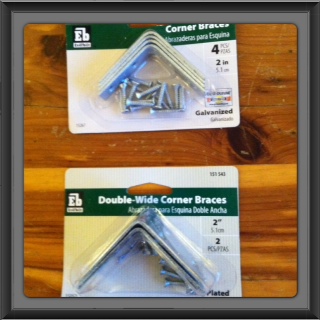
So I went to Home Depot and bought two 1 x 8 x 8 ft boards. 1 1/4 inch wood screws & 3/4 inch wood screws. I already had some Gorilla Wood Glue but you need to pick some up. I already had 3 brand new 2 x 4's at home waiting for me to need them! :) But you will need to buy two 2 x 4's. I also picked up these two different types of corner braces as the other Pinterester's used them. I didn't end up using them... But you might! So pick them up!
They (other Pinterest sofa table builders) also suggest that you ask Lowe's or Home Depot to make your board cuts for you. If you don't have a saw or you don't feel comfortable making your own cuts, by all means have them do it for you! You may find this funny.... But, I was super uncomfortable having them make my cuts! Why? Because I didn't trust my sketch or my measurements!! Hehehe.... Measure twice & cut once!!! I measured four times and cut once! Ya I was a bit scared... I called my bf, Adrian and talked with him about it and confessed to my scaredness! He said, "You can do it." I said, "But I'm scared I'm gonna screw it up....." He replied, "JUST DO IT & CALL ME WHEN YOU GET GOING!".......... Fine!
So I move down the hall and into the garage! Let's do this! But the lets is me by myself.... Oh, well.... I'm not much on pre-planning. I'm more of an, "I just got this idea! Drive to the store and buy the stuff to do it right here and now kinda girl..."
So I made my measurement for the 6 ft 10 inch top board.

Then I made my measurement for the two legs (31 inches each).
Then I used my electric Miter saw and made my cuts! Yes I have one of these... No i don't use it a lot. Probably used it 5 times in the past! But I needed it for a project about 10 years ago, so I bought it then. Any ol' saw would work... Or.... Home Depot or Lowe's also! :)


Ok. I cut the three pieces. Two legs and the top board. I put it together on the ground (without nailing or screwing it. Just layed it out) and then measured the distance from inside of the left leg to the inside of the right leg. This measurement I used to cut my 2 x 4. This is gonna be my stabilizing piece. I marked the measurement on the 2 x 4 and made the cut. I was again scared I wouldn't have the right measurement. So that's why I layed it out on the ground and measured it. I was scared if I just did the math in my head I would be short! Hehehe! But I'm sure glad I did! I made the perfect measurement and cut!
Sorry no pic.... I got all caught up in my work and forgot about photo ops! oops! :(
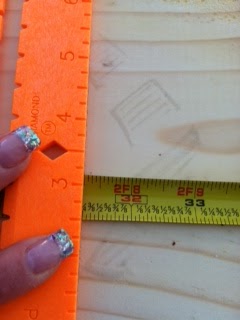
Then I measured the length of legs again and divided it in half, marked the halfway point on each leg.

Then I used my bran new Kreg Jig I bought last month (cuz a guy on Pinterest said if your gonna build anything, you gotta have one! So.... I went out and got one!) My bf thinks I'm a bit wacky.... :)
I got some scrap 2 x 4 and read the kreg jig directions 3 times and practiced 3 times on scrap wood... I figured I had it down and used the jig to predrill holes into the 2 x 4 to attach it to the legs. This IS NOT NECESSARY! You can use the Corner Braces to attached the 2 x 4 to the legs.
Attach the corner braces to the under side of the 2 x 4. You don't want anyone to see your handy work! (Put some Gorilla Wood Glue on the end of the 2 x 4 before you screw it to the inside leg. This will make a better bond.) Ok... Please DO NOT FORGET THE GORILLA GLUE. Why? It just simply makes the bond better! :)
Now you have 2 legs with a 2 x 4 in the middle of it. Stand it upright. Should look like a big H. No I didn't take pics of this stage! I was too into my handy work to take pics! I will work on that in the future! My Bad!
Place the top board of the H. I used a bit of Gorilla Glue and set it on top of the H. Then I used my air nail gun and tapped 2 inch nails into this bad boy... No you do not have to have this! You can use Corner Braces underneath the top to attach the left and right side.

At this point I was beaming with proudness! I sent a pic to my bf and he too was proud of my accomplishment! He had a concern.... And well I had to agree with him. The top of the sofa table board bowed down when I put my hand on it with some pressure... hmmmm... Well my bf said use some scrap 2 x 4 and stabilize it! That way it won't bend when we put stuff on it! Sounded good to me. So I measured the space between the 2 x 4 and the underside of the top. Exactly 15 inches. Ok. I cut two 15 inch 2 x 4's. Then I went to the left of the table and measured 30 inches and marked it. I did the same thing on the right side. This gave me exactly even places to place the 2 x 4's. For a even amount of stability. (and it looks more Prolike!!! ) I placed the 2 X 4's in there with a bit of Gorilla Wood Glue and again used my nail gun to attach the 2 x 4's (I LOVE MY NAIL GUN!) , again you could use Corner Braces to attach the top part of the 2 x 4 to the underside of the sofa table top and then flip the table upside down and hammer wood nails or screw screws into the bottom stabilizer 2 x 4 to the middle stabilizer.

And that is it!
Paint or stain to your liking. I have black furniture in the room that this piece is going into. But I didnt wanna paint my beautiful masterpiece! So, I used the only stain I had on hand. Provinco.


I was able to get one coat of stain on it before I ran out... So me and my son (Robbie and his gf, (Summer) went out to Farmer Boys to celebrate my handiwork. Afterward I picked up more stain... I decided on Ebony Stain.

Even though this was not the color I started with. I decided to use a darker one since I had black furniture in the room. When I got home, I applied it and it did darken it up nicely. I am extremely proud of my first build my own project! And I used my Kreg Jig too!! That part had me so nervous I had to run to the bathroom! lol... and yes I'm sure if I was an experienced wood worker/builder it would have turned out perfect..... but when I look at her.... I SEE PERFECTION! Is my proudness showing thru?
In the end, I ended up using 4 coats of stain & four coats of polyurethane. That took an additional 2 days.... but all the other work was 4 hours and that included going to home depot and buying everything I needed to do the job! Actual cutting and learning how to use the Kreg Jig and put it together was only 2 hours!

This is what she looks like in all her glory!


Now there are two Pinterest Posts that inspired me. These are the posts! Please read them and if you wanna try this, I say JUST DO IT!
xoxo,
Lori your Kustomkopykat
Thanks for stopping by!
ps.... yes the pics r from my iphone.... ;)
ps.... yes the pics r from my iphone.... ;)
No comments:
Post a Comment